Granny Bee Blocks - a tutorial
I know there are a number of tutorials online to make these blocks and I have so far used 2. One by Katy which uses 2.5' strips of fabric, which is perfect to make several of the same block. And another one by Blue Elephant Stitches which uses 2.5' squares which is perfect if you want to cut 25 squares different or not. I have come to use a method mixing both tutorials to make one block using a different fabric for each ring and I thought some of you might be interested in using the same method.
 To start with, you need to cut:
1 x 2.5' square for the center
1 x 2.5' strip at least 10.5' long for the first ring
1 x 2.5' strip at least 21' long for the second ring
1 x 2.5' strip at least 21' long for the background + 4 x 2.5' squares of background
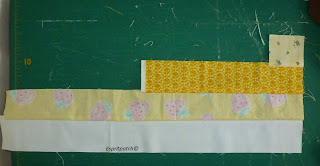
Take the background and "ring 2" strips and sew together. Lining the top, sew "ring 1" strip to "ring 2"+background and then add the centre square to obtain a piece like this.
Press the seams and slice your piece up into 2.5' units.
You should have
1 unit with 4 squares
3 units with 3 squares,
4 units with 2 squares
 Lay all your units to make up your blocks and sew your units into strips as shown below
And finally sew your strips together to finish off your block
I hope you find this tutorial useful and helpful. If anything doesn't make sense please let me know!
Linking with Building Blocks Tuesday, Sew Darn Crafty, Brit Sewing Thursday Linky and Friday Night Block Party
Celine


Love this tutorial! I've been admiring these blocks for awhile and you've laid it out so succinctly, I can now do them without any stress! Thanks so much!
ReplyDeleteElaine at Summercrafter.blogspot.com is having Friday night block parties (she just started them). This would be a great block to add to her party!!!
ReplyDeleteThis is so clever... I can't wait to give this a try one day!
ReplyDeleteGreat tutorial! I hope to be doing some granny squares later in the year. Bookmarking your page now!
ReplyDeleteYour tutorial looks very straightforward and I have good news, you won the bundle of fat eights in our giveaway (would be perfect for a project like this funnily enough!) you need to contact Liz to claim your prize!
ReplyDeleteFantastic tutorial.
ReplyDeleteThanks for sharing it Celine.
I love your Granny Square, I'm partial to yellow!! And thanks for stopping by the block party!!
ReplyDeleteLove your tutorial. I'm just seeing it and I will use it next month!!
ReplyDelete