Passport pouches
After I made the first pouch for my son in July before his Scouts trip, I thought it would be a good idea to make one each for the girls too before our big trip so that they could always carry with them a card with our phone number in case they got lost. It turned out that it was very useful too as everyone had to always carry their sea-pass during the cruise so it was a very safe place to keep it. I must say I regretted not making myself one.

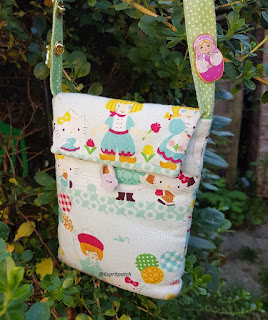
I choose left over pony fabric from her school bag for Middle Daughter

and Hello Kitty fabric for her little sister.
I used
2 pieces 5.5 x 7 of main and lining fabric for the body of the bag
1 piece 4 x 8.5 of the lining fabric for the inside zipped pocket
2 pieces 3' in height and 5.5' width at the top, 4.5' at the bottom for the flap
1 piece 2' x wof of fabric for the strap
2 pieces 5 x 6.5 interfacing for the body of the bag and one piece 2.5' in height and 5' width at the top, 4' at the bottom for the flap
1 piece of string and 1 button
4' zip


 The box is cut open (inside only) and the pocket is pushed inside the opening. The zip is pinned behind the opening and it is sewn in place from the front of the bag


 Next I made the flap by sewing the bottom and sides of the pieces together and inserting the piece of string for the button in the bottom seam.

The flap is attached to the top of the bag then the bag is constructed by sewing front and back pieces (right side together on the sides and on the bottom).
The lining pieces are sewn in the same way but a gap is left on one side for turning.
I very slightly boxed the corners.
The strap is constructed and sewn to the bag (after checking the length required). I made the strap in 2 parts attached by velcro to make it safer. That way if the strap gets caught, the velcro would get undone.
The bag is then placed inside the lining and all is assembled by sewing bag and lining around the top.
The bag is turned right side out and the opening in the lining is sewn shut.
Et voila! 2 cute little neck pouches for my girlies!
 And 2 more OPAM for August.
Linking to Whoop Whoop Friday and to One Monthly Goal
Celine

I choose left over pony fabric from her school bag for Middle Daughter

and Hello Kitty fabric for her little sister.

2 pieces 5.5 x 7 of main and lining fabric for the body of the bag
1 piece 4 x 8.5 of the lining fabric for the inside zipped pocket
2 pieces 3' in height and 5.5' width at the top, 4.5' at the bottom for the flap
1 piece 2' x wof of fabric for the strap
2 pieces 5 x 6.5 interfacing for the body of the bag and one piece 2.5' in height and 5' width at the top, 4' at the bottom for the flap
1 piece of string and 1 button
4' zip

First step is to make the internal zipped pocket. Box is 0.25 x 3 ' one inch from the top of the pocket fabric. Both layers are stitched together on the box.


The pocket fabric is then folded in half and sewn on the 3 sides to make the pocket


The flap is attached to the top of the bag then the bag is constructed by sewing front and back pieces (right side together on the sides and on the bottom).
The lining pieces are sewn in the same way but a gap is left on one side for turning.
I very slightly boxed the corners.
The strap is constructed and sewn to the bag (after checking the length required). I made the strap in 2 parts attached by velcro to make it safer. That way if the strap gets caught, the velcro would get undone.
The bag is then placed inside the lining and all is assembled by sewing bag and lining around the top.
The bag is turned right side out and the opening in the lining is sewn shut.
Et voila! 2 cute little neck pouches for my girlies!

Linking to Whoop Whoop Friday and to One Monthly Goal
Celine


I have a purse this size, and it works for every day use to walk the dog or go to the store. Not heavy or cumbersome, but big enough to carry the driver's license, credit card and cell phone. If I don't feel safe, I can carry it under my shirt.
ReplyDeleteFun bag. Thanks for linking up with Elm Street Quilts One Monthly Goal and congrats on your finish!
ReplyDeleteWhat a great idea! I can see this size pouch working for lots of thins. But, Mom, you should not neglect yourself. You need one, too! :-)
ReplyDelete